Yealink W52p Setup Guide
1. To find the IP address of the Yealink W52p base:
Press 'End call' (red button) until you're back on the home screen
Press 'Ok'
Select 'Status' (the icon with a blue circle and the letter "i" in the middle) and press 'Ok'
Select 'Base' and press 'Ok'
The Yealink phone will show IP: and the IP address
2. Make sure that your computer is connected to the same network and then enter that IP address in your computer's web browser address bar.
3. You should then see the Yealink login page, the default username is admin and default password is admin.

4. Click the Account Tab and enter the following details:
- Line Status: Enabled
- Label: Anything you like, it's just the name that shows on your phone's screen e.g. Ext. 200
- Display Name: The name you would like to display when calling other extensions on your system e.g. Ext. 200
- Register Name & User Name: Your Voipfone Account Number or Account Number*Extension Number e.g. 30000000*200
- Password: Your phone password or extension password depending on what you set above
- SIP Server 1 Host: sip.voipfone.net
- Port: 5060
- Server Expires: 60
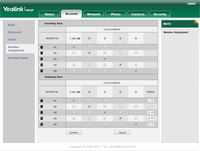
5. Click on Number Assignment.
6. Standard Configuration would be to set one line to one handset, i.e. Line 1 would be ticked only against H1, for both incoming and outgoing calls (the name will be the label you set on the account details page). The default for outgoing would also be 1. Click Confirm to save.

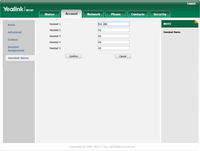
7. Click on Handset Name and give handset the same name that you put in the label field on the account registration page. Click Confirm to save and your Yealink handset should be setup.

Please note: These are basic account settings for getting your Yealink W52p registered and does not include security settings for your phone or your network, or settings that would be personal preference. For more information please contact your IT support team or the hardware manufacturer.


