SipTone II Configuration Guide
1. Plug the phone into your network. When the phone has booted up, press INFO / MUTE to obtain the phone's IP Address.
2. Type the IP Address into a web browser on a local PC. At the password prompt enter User = admin, Password = admin you should end up on the main screen.
3. From the navigation bar on the top, click on Network Setup. Ensure that you have selected DHCP mode for your network setup.
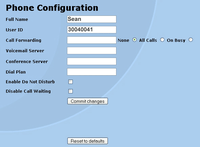
4. From the navigation bar, click on Phone Configuration. As per the image on the right, set Full Name to whatever you want and User ID to your Voipfone Number. Click on Commit to save changes.

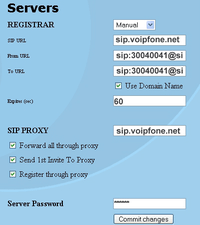
5. From the navigation bar, click on Servers. Set all values exactly as detailed on the right with the exception of From URL and To URL both of which should be set to:
sip:[Voipfone Number]@voipfone.net
Set SIP URL to sip:voipfone.net
Set SIP PROXY equal to sip:voipfone.net
Click on Commit to save your changes.

6. Dial 152 to check that you are connected to the Voipfone Network.


